Hello to everyone who read my blog,
I just wanted to do a little update as far as why I haven't been writing my blogs as much. I actually haven't had the proper tools meaning my computer broke so I am using my phone or iPad and to be honest with you guys its a bit difficult to write and get in the "Zone" when you don't have an actual computer to use . So not that I'm trying to get sympathy from anyone that is why I have slowed things down a bit.
Also, I just wanted HELP!!!
I really really really and I'm being serious I really enjoy giving gifts. So on that note I have been wanting to do giveaways, but I haven't had anyone actually follow me on this blog. So I was hoping you guys could help me get followers to follow my blog and once I hit a certain number I will do a giveaway and I will constantly do them as long as you guys enjoy them.
Please note I understand not everyone will like my blog or is even interested in it, but I try my best to be enjoyable and would really appreciate if you would help me.
One more thing it is still in progress and I am still needing lots of practice but I have finally made a YouTube channel it is under yahya0413 please check it out and if interested in future videos please subscribe. I don't have many videos up yet but onces I get the right tools I need (like a computer) I will have them going regularly.
XOXO
Saturday, November 24, 2012
Friday, November 2, 2012
Violet Eyes

Hey,
Well this is a look I was playing around with and felt it would be fun to do a step by step make-up look. So I provided steps as well as a picture to go with each step so you can see what it looks like in progress.
All the products I used are AVON and are amazing quality and super affordable. I hope you enjoy.
XOXO
Step 1:
As a primer/ base I used a cream eyeshadow pencil to help my eyeshadows last all day and night.


Step 2:
Using a flat shader brush I applied a light shimmery lilac color to the inner 3rd of my eye lid, also using it to highlight my inner tear ducts.


Step 3:
With a Round Crease brush I used a medium lavender color, and pack it on to the outer corner using a circular motion to give it a curved look also working it into my crease.


Step 4:
Using an angled liner brush I took a dark blue color and made a “V” shape inside the Rounded shape made with the lavender, also dragging it into my crease to blend the colors a bit more.


Step 5:
Once again with the round crease brush I took a silver color to blend out any visible harsh lines and dragged it up to the brow.


**Note at this point it looks crazy weird and messy but at this point I will be fixing that. **
Step 6:
Now re-doing step 2 is what will help enhance the colors and will clean the look up a bit.
Step 7:
Using a light white color I put it under my eyebrow to highlight


Step 8:
Now using an angled liner brush I took a dark blue eyeshadow to line under my water line. This step helps enhance the blue I put on my lid.
Step 9:
Ok now I will just be lining my top lash line with liquid liner and using a pencil I will line my water line as well as my tight line.


Step 10:
I added mascara using 2 or 3 coats to extend and make them appear full also adding that to my lower lashes as well.

Now, to finish off the look all I did was add a little bit of bronzer to the hollows of my cheeks and a highlighter to highlight the tops of my cheek bones. Then, I added a pinky mauve lipstick and lip gloss on top.
Products Used:
Big Color Eye Pencil- Lightening
Eyeshadow Quad- Vivid Violet
Heavenly Eyshadow Trio- Plum
Glow Bronzer- Warm Glow
Glow Bronzer- Sun kissed Glow (Highlighter)
Extra lasting Liquid Eyeliner- Black
Ultra Luxury Pencil Liner- Black
Big Color Lip Pencil- Pink Champagne
Mark Juice Gem- Lemon Sugar
Glow Bronzing Brush
Dual Sided Brush- Flat shader and Angled Liner
Rounded Crease Brush

Saturday, October 27, 2012
Spooky or Cute?
Hey,
I hope everyone is having a wonderful day. I was wondering would you wear this? or do you think this is just a little spooky looking with these specific colors?

Well as far as this look when I did it I was like eehhh, it is cute, but I felt I wouldn't ever wear it out. But to be honest I love wild and crazy make-up looks so that means that ummm duh, I have totally falling in love with this technique. This wide eyed cat look it amazing on anyone especially people who have a smaller lid area it is just great to make your eyes look bigger. Also, keep in mind you can use any colors to create this.
XOXO
Diamond Ice
Hello Everyone,
How is your day? Mine is wonderful!
Well today's post is quite "Darling" like if I may say so. It's very toned down (compared to my other post). This look is very pretty especially for prom or a special event. It is very enchanted it almost reminds me of Cinderella's dress hmmm.... what do you think?

I love the extra detail that I used in this look with the medium sized rhinestones. In all honesty I would probably have used smaller rhinestones and used maybe up to 6 or 7 of them just to make it look a little more glamorous. The eyeshadows I used in this look were all by "Micabella Cosmetics". They have wonderful products that can be used in so many different ways, but this particular time I used them dry just so it wouldn't be so intense in color. Please let me know what you think and where would you where this look to?
XOXO
Thursday, October 25, 2012
Clown? Joker? Jester?
Halloween Look:
Clown? Joker? Jester?

Hello everyone I hope your day is well. Well I had to share this Halloween look with you. I had so much fun like I always do doing make-up looks, but this was especially fun because my boyfriend allowed me to do his make-up.
Well the funny thing is I always thought of this look as a joker, then soon realized that its more of a clown look. Which is always so much fun. I tried to make it a little more glamours by using false lashes well extreme lashes. I also used red glitter on my nose and lips to give a sparkle.

I hope you enjoyed this post to be honest with you I was kind of scared of myself when I finish. Oh by the way can you tell I covered my real eyebrows and drew on fake ones.
XOXO
Tuesday, October 23, 2012
N.O.T.D 10.23.12 & Review

OMG!!!
I did not expect such an amazing nail polish. This nail polish is called "Steal the Show" by Victoria Secret. This polish is amazing it have such a wonderful color pay off, and to be honest you only need to use one coat. Here I used 2 but I feel it is a rule to always do 2 coats no matter how pigmented they are.
I guess you could almost say this is a mini review because this is the first time I ever tried Victoria Secret polishes. I love it and I should soon be purchasing more colors.
XOXO
Vampy Wing
Hello Everyone I hope your day is well so far.
I always have so much fun writing on my blog, and creating these looks. It takes lots of time, but I feel that it is so worth every minute. I kind of wanted to start this blog by saying thank you to whom ever reads these. I really do get jittery inside and very excited to see that someone actually reads them.
Well as for this look it was extremely fun to do and just so you know my boyfriend was actually like wow! you should totally do that everyday he loved it. :) This look is really fun it kind of tricks people to thinking you forgot to connect your wing liner.

Then, you close your eyes you then see its a complete line. My mom and sister were like "oh, wow! That's cool". I love the way it looks its kind of shows off your eyes especially the color, because there isn't any other shades fighting for attention.

I then, felt it was safe to pair it with a hot pink lipstick. I also went ahead and outlined my lips then blended it with black to give my lips a little definition.

And don't forget to color in your eyebrows a little bit, because the look is dramatic and completely wash mine out.

I hope you enjoyed this look. I know I really enjoy all the looks I have created and would hope you did as well.
XOXO
Friday, October 19, 2012
Colorful Spiked Eyes
Halloween Anyone?
I hope your day has been good so far. I just wanted to write a little about this particular make-up look that I created on myself. I orginally wanted to make it an extreme wearable look and yes "wearable" but kinda got carried away with COLOR. This was so fun to do, but took a long time mainly because I wasn't quite sure where I was trying to take this look. This would be a cute make-up look for halloween especially if your like me and never really dresses up, but wants to do something creative.


What did I do?
I used a white eyeshadow base all over my eye and kinda got carried away and used it to make my skin look even more ghostly white. Then, used several of the chubby eyeshadow pencils to make my spikes on my eye and lower lash line trying to make the lines as straight as possible. Then, picked out the colors I wanted to use to fill in my spikes. The lips are really cool I used a lip balm first and then put a green eyeshadow on top, and in the center to give it an ombre kinda look I used a gold to show that my lips had some dimension. Oh and as for my eyebrows I colored them with a white chubby pencil and place shadows on top just to lighten and color them you know just depending on which side your doing.
I think this would look completely awesome to have both eyes look the same using which ever side is your favorite.
I hope you enjoyed this post like I said before this was so fun.
XOXO
Tuesday, October 16, 2012
Nail of the day 10.16.10
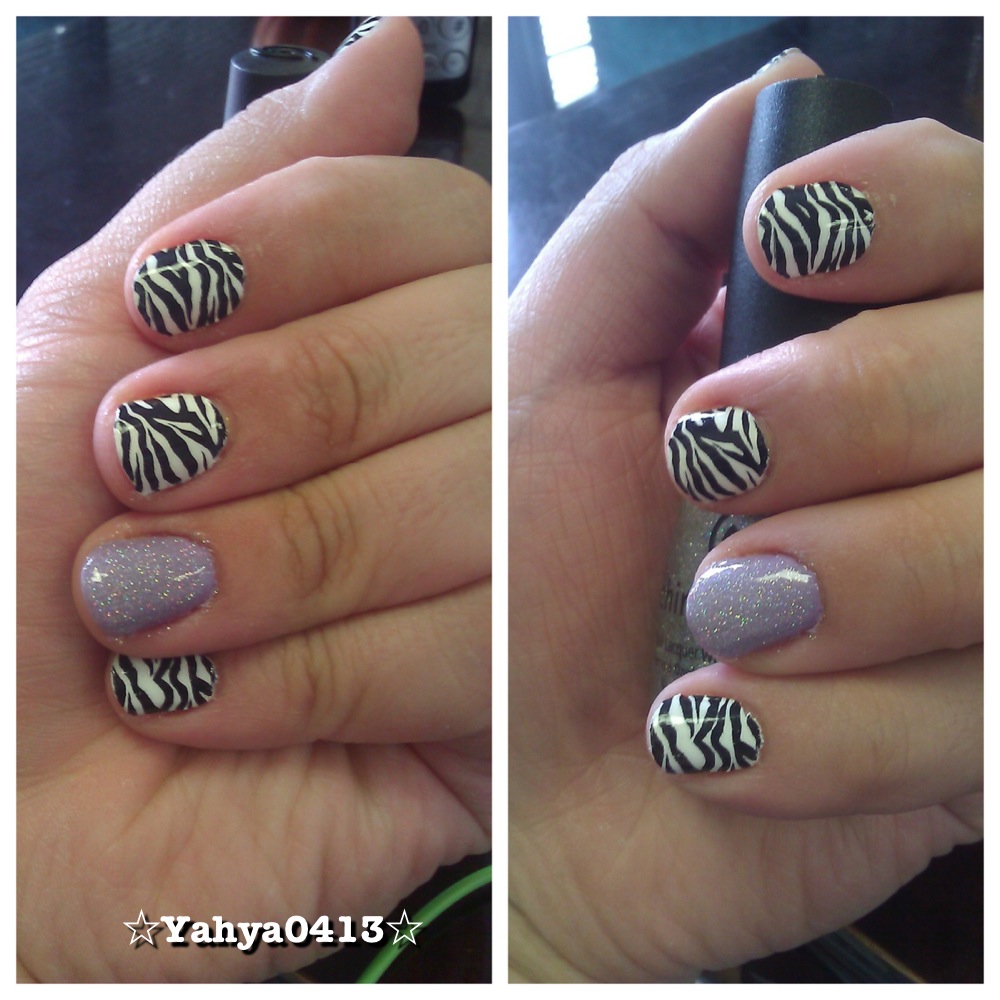
Zebra Print Nails are the Sally Hansen Salon Effects Real Nail Polish Strips in "Wild Child" - These are so awesome they come in so many different designs and colors. They advertise that they should last up to 10 days. For me I am hard with my hands and always washing and cleaning so they lasted a good 5 days with minimal chipping. Oh and just so you know you may want to use a very good nail polish remover, because it took forever to remover.
As for the lavender color it is an Avon Nail Polish in "Loving Lavender" and on top is a glitter by China Glaze in "Fairy Dust".
This is a fun little twist to any outfit, and to be honest with you it kind of makes me happy to look at. :D
Saturday, October 13, 2012
Before / After
Hello,
Well today's post is going to show you that a little gloss and mega dramatic liner can make a tremendous difference well at least on me. I had so much fun with this look as you can see the before all I had on was a purple eyeliner from Avon its one of the chrome liners in "Violet Chrome" (which is amazing). Also just a little mascara and black liner on the the bottom water line. That is what I had on from work then realized I love color and why not just "ENHANCE" my look a little.

So, needless to say I used a beautiful purple glitter liner on top, and a bright and bold turquoise glitter liner on bottom. I really wanted to go for a dark lip but figured my eyes had tons of color so I felt it was safe to keep it pretty neutral. Would you have used a darker color?
XOXO
Wednesday, October 10, 2012
Nail of the Day 10.10.12


Today I seem to have been really wanting something super bright, because these colors are completely bold and fun. The greenish gold color is very unique and fun I like to see it as a mustard yellow with glitter. Now, the bronzish rose color is so pretty is cute especially paired with other colors.
Greenish Gold- O.P.I Nail Laquer in "Simply Smashing"
Bronzish Rose- AVON Nail Laquer in "Rave"
XOXO
Tuesday, October 9, 2012
Mega Winged Liner

Hey Everyone,
Well today's post is a little different this look it is a "MEGA WING." I had so much fun creating this it is a softer winged look; which later I will probaly be posting a more dramatic wing look that also starts from the crease. As for this look it was super simple and fun the outter wing is with eyeshadow so it was easy to keep it soft but dramtic at the same time. Trying to make it more of a shadow of the small liquid winged liner. I think this would be fun for a night out or if your a little more risk taking I would rock this out during the day.
XOXO
Saturday, October 6, 2012
Nail of the day 10.06.12
Hey,
Well I'm never quite sure how to do nail post but I enjoy doing them. I mean even if I just post a picture and the name of the color that's fine right?
Well today I used "Deluxe Chocolate" by AVON and its a gorgeous color its dark brown with gold glitter in it. Very perfect for fall.


I also show the nail strengthener I used as well as my base coat, top coat, and cuticle oil.
Nail Strengthener- SinFulColors
Base Coat- Seche Base
Top Coat- Seche Vite
Cuticle Oil- AVON
The cool thing about my nail strengthener is that its also an "Anti-Bite" polish as well which is basically a polish that taste horrible when you bite on your nails. Also the base coat I use is a "Ridge Filling Base Coast" which help the indention on my nails.
XOXO
Subscribe to:
Posts (Atom)