Showing posts with label Avon. Show all posts

Thursday, February 13, 2014

Valentine's Day Nails Part II 2.13.14

So... Valentine's Day is only a day away and I felt I should share a few nail designs I did on my mom and sisters. I love the looks and they are all very different. I am not a nail expert nor a professional, but I try my best and I enjoy creating different looks.

Valentine's Day is about love and showing love for that special someone. Weather you have that someone or not I feel there's always a reason to show some love to yourself and give yourself a cute, fun, and flirty manicure. :-)


The first manicure I did was on my sister I felt like bringing out her glamorous side by creating a 50's inspire manicure. I felt red was completely perfect for the 50's look and adding rhinestones, faux pearls, and glitter as accents adds the glamor to the design.
 
 
*Red: Sally Hansen Xtreme Wear in Cherry Red White: Avon Nailwear Pro in French Tip White Silver glitter: Avon Brilliant Chrome loose glitter*
 
 
The second manicure I did was on my mom and first off may I just say she NEVER paints her nails nor does she ever let anyone do it so I felt pretty honored :-). Well back to the nails; she specifically requested to keep it simple, work appropriate, and not crazy. So for her Valentine's day nails I used a nude almost pale gray color and adding a rhinestone just to make it a little less basic. The single stone plays it up enough to make the design classy, yet a bit sassy.
 
 
*Nude: Revlon ColorStay in Bare Bones*
 
 
The third manicure I did was on my little sister. I felt she needed crazy, girly, and flirty nails. On one hand I added "I <3 U" with to pale pink nails with glitter on top. Then the other hand I just put a heart on the ring finger and adding glitter to a few nails and keeping the pinky pink to add a little dimension to the look. A lot is going on with this manicure, but I felt its a fun look and she is young so it works.
 
 
*Pink: Lime Crime in Parfait Day, Red: Sally Hansen Xtreme Wear in Cherry Red, Silver glitter: Avon Brilliant Chrome loose glitter*
 
I hope you enjoyed these different nail designs I plan in the future to be a little more detailed. I want to thank my mom, sister Ashley, and my little sister Andrea for letting me do their nails and take pictures. Also, I hope your decide to give yourself a well deserved "mani".
 
Happy Valentine's Day!!!
 
XOXO,
Yahya


Wednesday, February 5, 2014

I'm Back 2014

Oh WOW!!! I can't believe it has almost been a YEAR since I have written a post! I have many reasons for not blogging, but no excuses for neglecting my blog for a year. I guess to be honest I felt it was the one thing out of many that I miss doing in life.

I guess I should start off with the reason why I kinda failed to blog in 2013. :-)

Well, let see first thing first I thought 2013 was going to be wonderful (why this year than any other I don't know) and well... that was a FAIL!

That wasn't the case for me I guess wonderful was a little over the top. Now, I really can't say it was the worse year either I was just very busy.  Just the same ol' same ol' you know working, working, and more working, and a lot of STRESSING.

On the bright side the Avon store was extremely blessed in 2013. Very busy and tons of new items that came out. keeping track and keeping stock is stressful, yet a good sign in a business. My dad and I were extremely exhausted yet happy everyday last year.

For sure 2013 was a bit stressful, yet very blessed.

(Before we begin)

Ok so to kinda keep you guys up to date... I am one of those people who over thinks the situation. I obviously understand certain circumstances, but on the other hand I will probably go home and think and think and think and well yah you get the point right?

Now, back to my story. After I posted my first make-up video on YouTube I kind of fell down in the dump. I didn't understand why I was doing it I thought maybe I was making a video for others then felt I was doing it just for fun. Then realized I was the only one watching it and I felt a little discouraged. I am not quite sure why I felt so bad especially now thinking back on it. I'm not sure why making a video and writing blog posts would have made me feel so horrible about myself. I guess I felt it was pointless. I completely forgot the reason for starting the blog. Which was/is for myself... to keep me busy, sane, and to express myself to whomever may or may not come across my blog. So for this first reason I guess I could have just summed it up and say I was being LAZY!

So, that brings me to the second reason which would tie the first reason with a bow at the end and that would be my health. Which may explain why I was getting all emotional and stuff. I found out only a few months ago about my health but it plays well into my reasoning's. It seem like in 2012 I was perfectly fine and then BAM! a year later everything from blood pressure to thyroids to cholesterol to taking only one medication to having to take a whole lotta JUNK! I'm still in the process of fixing myself because of me being an over thinker I feel maybe by expressing my self through a simple blog post will help me. I have started my journey of exercising and for a person like myself who has never in my life exercised or ran around (literally I would cry myself out of PE) it is a HUGE step for me to take. So far so good I feel better not only about starting my adventure, but in general my mind is clear, my body feels refreshed, and I feel I can finally breath.

So, those are my two reason for not blogging which in a simple summary would be pure laziness and health issues.

Now, my reasoning for starting my blog up again is I have so many ideas that I want to let my heart and brain express. I want to post my exercises, my thoughts good and bad on how I felt after I exercised for the first time and how I feel now. Maybe a few pictures and ideas I have in mind for my future wedding....

Oh yah by the way did I mention that was a plus in 2013

November 28th, 2013 I got engaged!!!!

So, needless to say I will probably post wedding ideas I may have. I also want to jump back into my make-up post and nails of the days. I have a few girls booked to get there prom make-up done so I will post about that. I have so many great ideas that I hope this year will be better.

Blogging is something that makes me happy it makes me feel in control of what I doing with my time and is a journal for me to look back on to one day and remember what I was thinking, doing, or feeling at that moment. I have finally found that one thing my heart was missing and that is blogging.


                                                                    XOXO,

                                                                    Yahya


Friday, November 2, 2012

Violet Eyes

Hey,
Well this is a look I was playing around with and felt it would be fun to do a step by step make-up look. So I provided steps as well as a picture to go with each step so you can see what it looks like in progress.
All the products I used are AVON and are amazing quality and super affordable. I hope you enjoy.

XOXO

Step 1:
As a primer/ base I used a cream eyeshadow pencil to help my eyeshadows last all day and night.


Step 2:
Using a flat shader brush I applied a light shimmery lilac color to the inner 3rd of my eye lid, also using it to highlight my inner tear ducts.


Step 3:
With a Round Crease brush I used a medium lavender color, and pack it on to the outer corner using a circular motion to give it a curved look also working it into my crease.  


Step 4:
Using an angled liner brush I took a dark blue color and made a “V” shape inside the Rounded shape made with the lavender, also dragging it into my crease to blend the colors a bit more.


Step 5:
Once again with the round crease brush I took a silver color to blend out any visible harsh lines and dragged it up to the brow.


          **Note at this point it looks crazy weird and messy but at this point I will be fixing that. **

Step 6:
Now re-doing step 2 is what will help enhance the colors and will clean the look up a bit.


Step 7:
Using a light white color I put it under my eyebrow to highlight


Step 8:
Now using an angled liner brush I took a dark blue eyeshadow to line under my water line. This step helps enhance the blue I put on my lid.


Step 9:
Ok now I will just be lining my top lash line with liquid liner and using a pencil I will line my water line as well as my tight line.


Step 10:
I added mascara using 2 or 3 coats to extend and make them appear full also adding that to my lower lashes as well.


Now, to finish off the look all I did was add a little bit of bronzer to the hollows of my cheeks and a highlighter to highlight the tops of my cheek bones. Then, I added a pinky mauve lipstick and lip gloss on top.

Products Used:

Big Color Eye Pencil- Lightening
Eyeshadow Quad- Vivid Violet
Heavenly Eyshadow Trio- Plum
Glow Bronzer- Warm Glow
Glow Bronzer- Sun kissed Glow (Highlighter)
Extra lasting Liquid Eyeliner- Black
Ultra Luxury Pencil Liner- Black
Big Color Lip Pencil- Pink Champagne
Mark Juice Gem- Lemon Sugar
Glow Bronzing Brush
Dual Sided Brush- Flat shader and Angled Liner
Rounded Crease Brush

Pin It

Tuesday, October 16, 2012

Nail of the day 10.16.10


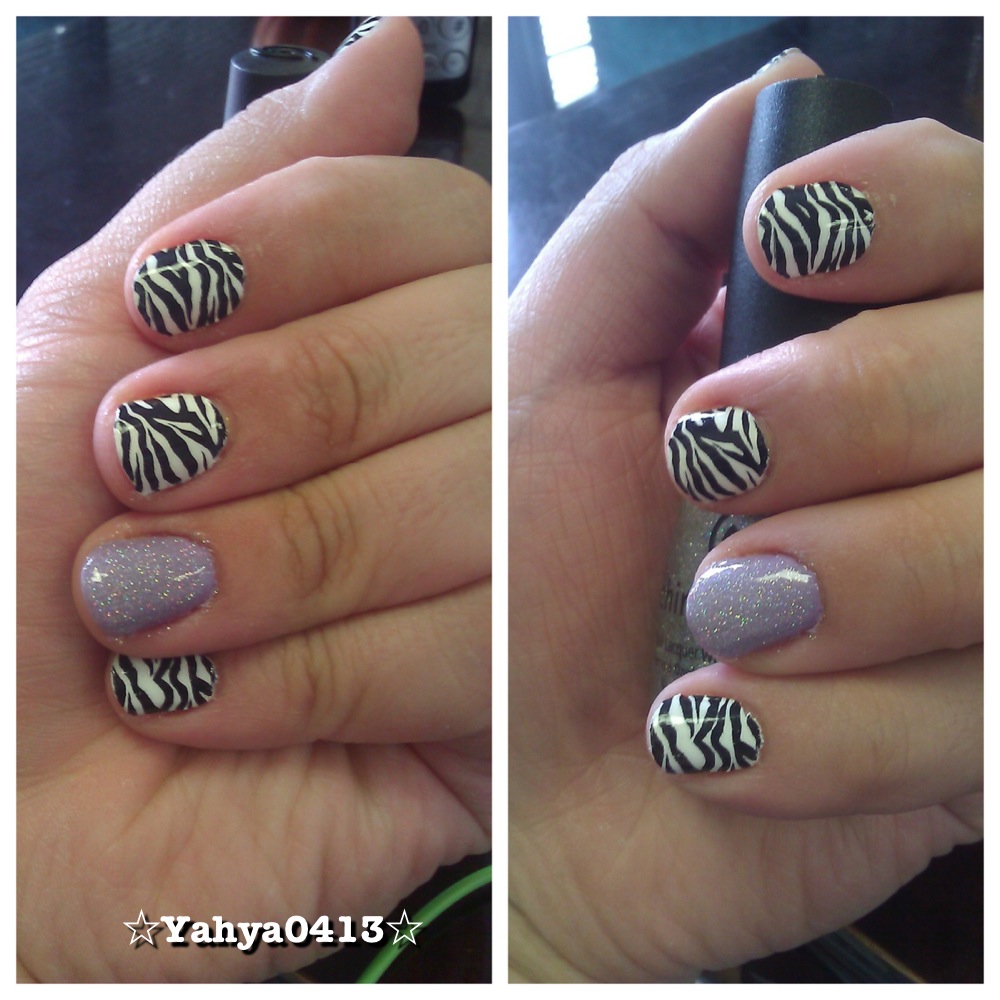
Zebra Print Nails are the Sally Hansen Salon Effects Real Nail Polish Strips in "Wild Child" - These are so awesome they come in so many different designs and colors. They advertise that they should last up to 10 days. For me I am hard with my hands and always washing and cleaning so they lasted a good 5 days with minimal chipping. Oh and just so you know you may want to use a very good nail polish remover, because it took forever to remover.

As for the lavender color it is an Avon Nail Polish in "Loving Lavender" and on top is a glitter by China Glaze in "Fairy Dust".

This is a fun little twist to any outfit, and to be honest with you it kind of makes me happy to look at. :D


Pin It

Saturday, October 13, 2012

Before / After

Hello,

       Well today's post is going to show you that a little gloss and mega dramatic liner can make a tremendous difference well at least on me. I had so much fun with this look as you can see the before all I had on was a purple eyeliner from Avon its one of the chrome liners in "Violet Chrome" (which is amazing). Also just a little mascara and black liner on the the bottom water line. That is what I had on from work then realized I love color and why not just "ENHANCE" my look a little.


       So, needless to say I used a beautiful purple glitter liner on top, and a bright and bold turquoise glitter liner on bottom. I really wanted to go for a dark lip but figured my eyes had tons of color so I felt it was safe to keep it pretty neutral. Would you have used a darker color?


XOXO


Pin It

Wednesday, October 10, 2012

Nail of the Day 10.10.12


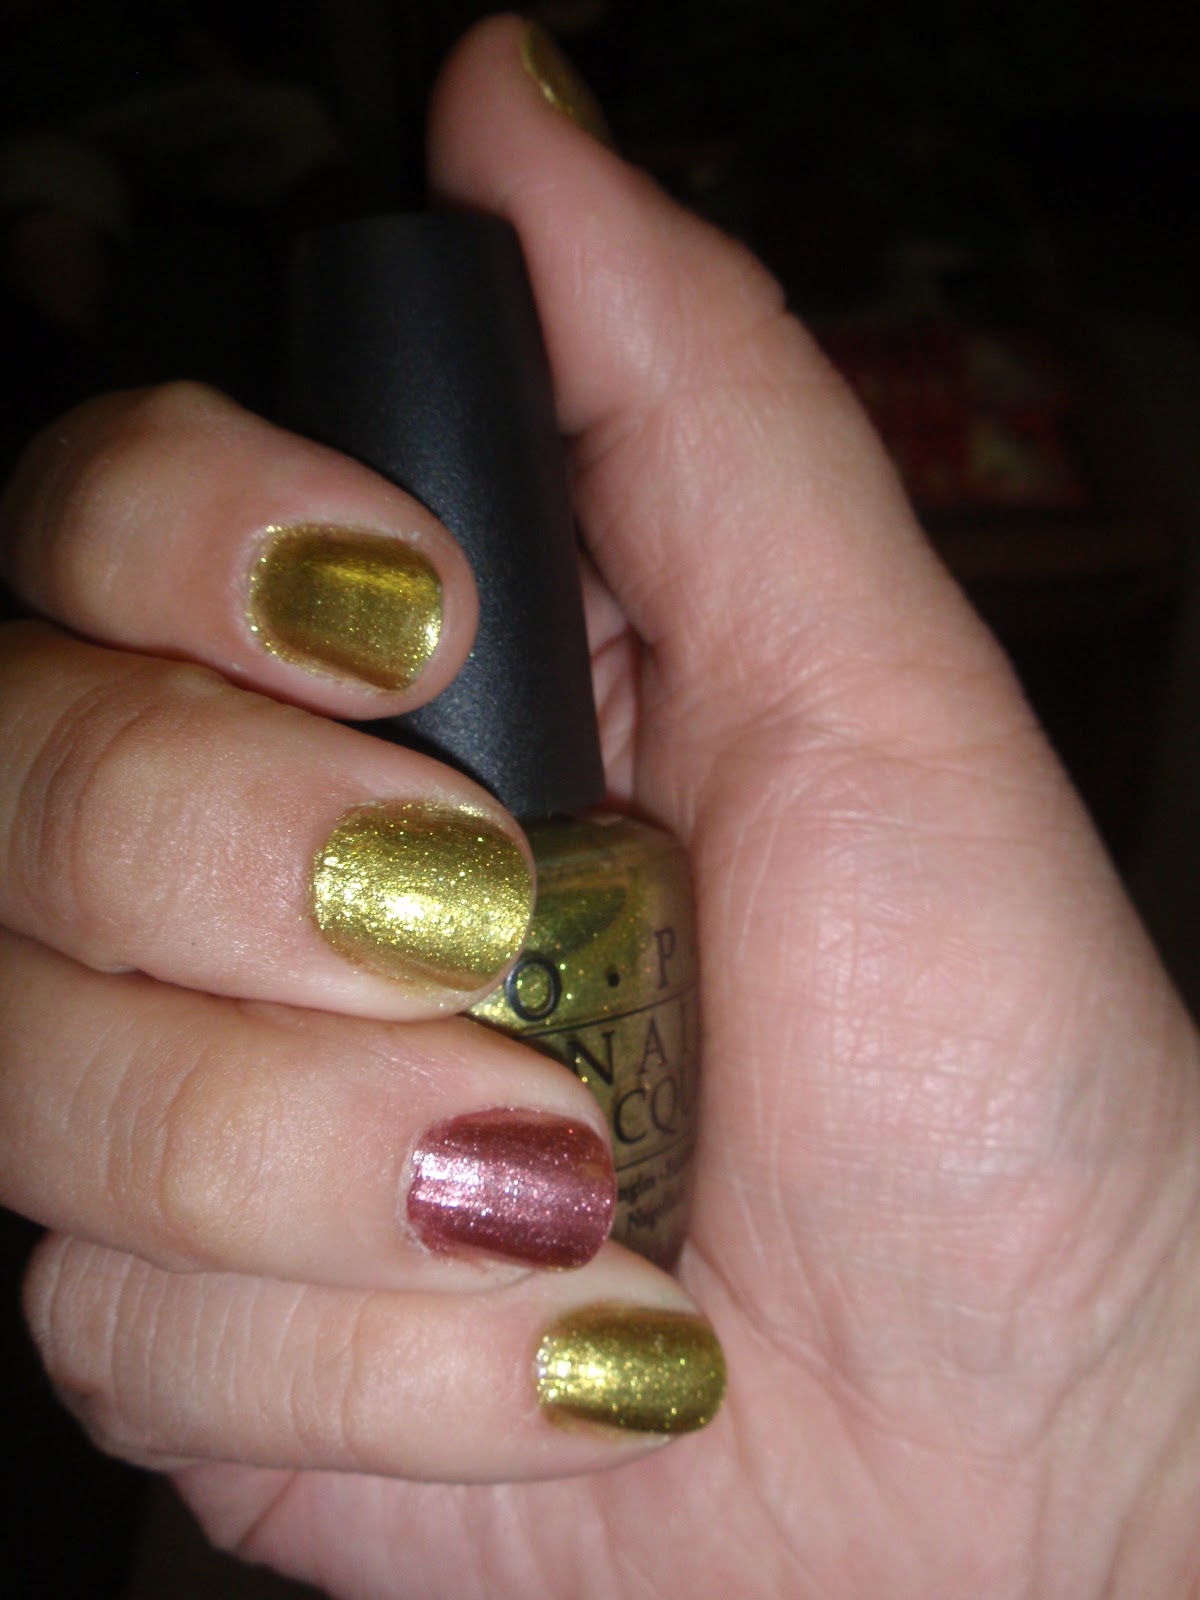
Today I seem to have been really wanting something super bright, because these colors are completely bold and fun. The greenish gold color is very unique and fun I like to see it as a mustard yellow with glitter. Now, the bronzish rose color is so pretty is cute especially paired with other colors.


Greenish Gold- O.P.I Nail Laquer in "Simply Smashing"

Bronzish Rose- AVON Nail Laquer in "Rave"


XOXO

Pin It

Monday, May 16, 2011

Favorite Mascara...

SUPER SHOCK is its name and I LOVE IT!!!!

Super Shock is by Avon and it only cost 9.00 (but is usually on sale :D)
Avon says:Get yourself some extreme volume! Thickening base coat and volumizing mascara in one. Up to 12X more volume.”
I say:  ITS ALL TRUE! This mascara is wonderful and the best thing about it you can apply as much as you want and it won’t clump up. Another great fact is that Avon assures us that “ All AVON mascaras are hypoallergenic and opthalmologist-tested.
What is your favorite mascara? I would love to know so I can check it out :D
Have a wonderful day
XOXO,
Alyssa


Thursday, April 28, 2011

Eyeshadow Primers...

What it does:
Eyeshadow primer is a cosmetic that is used to coat the eyelids prior to the application of eyeshadow so the eyeshadow can be applied in a smooth, even layer and so the eyeshadow will stay in place on the eyelid. Some people find that creases appear in their eyeshadow during the day. These creases are the result of movements of the eyelids such as blinking and normal eye movements. Eyeshadow primer works to keep these creases from appearing and can also help to boost the vibrancy of the eyeshadow color as well as allowing your eyeshadow to stay on longer.
My Opinion:
I have tried lots of different brands and types of eyeshadow primers and I have not had any trouble with any that I have used. Of course the texture, consistency, and feel on the eye lids are all different. I personally believe when choosing a primer it depends on all of those things. Whether you like a light or heavy feeling, thin or thick application, or if you want it skin tone, white, colors, or even if you want it to be clear. It all depends on what you prefer.
These are the ones I have tried…
·         Sephora Perfecting Eye Primer $14.00- Clear
·         Urban Decay Eyeshadow primer Potion $19.00- Original
·         Mark. Please Hold Eye Primer $8.00- Light
·         Avon Anew Youth-Awakening Eyeshadow & Primer Set $12.00
·         E.L.F Essential Eyelid Primer $1.00
·         E.L.F Mineral Eyeshadow Primer $3.00
·         Kat Von D High Voltage Eye Primer $15.00- Stellar

Ones I would love to try…
·         MAC Prep + Prime Eye $16.50
·         NXY Eyeshadow Base $7.00
·         NARS Smudge Proof Eyeshadow Base $24.00
·         Too Faced Shadow Insurance $18.00
·         Sephora Eye Primer Pot $8.00
I am so sure there are lots more that I would love to try :D
 WOW! Did you know that there were tons of really good eyeshadow primers out there? I personally did not realize how many there were until I started to write this Blog post :D
 
Well Thank you for reading, if you have any other suggestions or tips about primers please let me know. Also I will post a blog on other things that can be substituted or even instead of a eyeshadow primer. :D
XOXO
Alyssa 

Thursday, April 21, 2011

Products Review:

Liquid Liners-
Are you a fan of liquid liners? I am!  and I am always looking for the next best thing in liquid liners. I have tried several liquid liners within the past 2 weeks; to see if there was anything in comparison to the one I have been using for about 4 ½ years now. When looking for liquid liners I am more interested in finding one that is simple to use, easy to apply, has a bold color, and is long wearing. I only went to a few places to see if there were any I thought would be worth trying out. I will be rating the products I have used using a rating scale 1 out of 5 or whatever the case may be, and I will also give my opinion on each product. I will defiantly keep you all posted on any new liquid liners I may find and  try out.

v  Avon Perfect Wear EyeWriter Liquid Eyeliner  (Evening Black) $8.00
Ø  Claims: “Hold the line… with smudge-proof, waterproof color. Smooth, rich color, glides on evenly, last all day.”
** 5 out of 5 - This is my favorite liquid liner of all time I have been using it for a really long time now. This liner has a “normal” and simple packaging. It also has a really good color payoff and it actually does everything that it claims to do it just pure WONDERFUL. I still to this day have not found anything in comparison to this liner.**

v  Mark. On the Edge Hook Up Liquid Liner (Cleo) $6.00
Ø  Claims: “Get a precise long wearing finish with this quick-drying, easy to apply liquid liner.”
** 4 out of 5 - This is a wonderful liner it has a really bold color to it. It does do majority of what it claims, but it is just so small and hard to use EXCEPT if you buy 2 things and hook them up it is wonderful. It’s just the packaging that makes it lose a star.**

v E.L.F Waterproof Eyeliner Pen (Black) $1.00-
Ø   Claims: “Get no smudge with no-budge eyeliner which creates a fabulous and fresh look of precision.”
** 3 out of 5 - This liner has really surprised me for it to only cost a $1.00 I am very impressed with it. I am already running out of product, but for only a buck it is really good.

v Sephora Doe Eyed Felt Eyeliner (Ink Black) $12.00
ØClaims: “A long-lasting eyeliner with precise felt tip to define the eyes in one stroke.”
** 1 out of 5 -  This liner when I first tried it I was great, but when I went to use it  for the second time it was already out of product. $12.00 is kind of a lot of money for a one time use.**
Please let me know if you have a favorite liquid liner I would love to keep trying new ones. Also THANK YOU for reading please follow me for more Reviews, Makeup Looks, Makeup Tips, Hauls, and Much More.
XOXO,
Alyssa
Disclaimer: Any thoughts that I express here are my own, and do not reflect the opinion of any of the companies I have mentioned in this blog post.

Tuesday, April 12, 2011

Makeup of the Day


Today has been a very chilled and relaxed day.  I went to school and then work, the look I have on today is just quick and simple. I used a primer all over the eye and just a natural cream color on top. Then I used perfect wear liquid liner from Avon in “Evening Black” in my opinion it is one of the best ones they have. I just lined the top of my lash line and extended the liner to make a winged cat eye. Next I got a vibrant bold color which I used a bright neon turquoise blue to line my lower lash line to add a pop of color; that away the look isn’t too simple. Lastly I used the Shock mascara from Avon in “Black” it is AWESOME because it lengthens and thickens my lashes without any clumps. I hope everyone’s day is going good I am just extremely excited that I am turning “21” tomorrow! I can’t believe that time is going by so fast. I hope everyone enjoys the rest of their day.

:D Alyssa

Friday, April 8, 2011

Makeup Look #1

                                                                                                       Ash R. is featured in this picture

In this look I used the eyeshadow quad from Avon called “Earth Tones". This particular way that I applied the eyeshadow was to define and contour the crease and outer corners of the eyes. I first applied an eyeshadow primer (which I will post a blog about very soon), then applied the goldish color called "Citrine" to the entire eye lid using a fluffy eyeshadow brush to show the contrast of each color or as it is know as the "back ground color". After that you try to focus more on the crease color which I used the brown/merlot color called "Truffle" using a small or a detailed eyeshadow brush will help to form the winged look on the outer corner. Also using the same brush drag that same color through the hollow of your eyes to give more of a dramatic allusion. Now to add a little pop of color to this look I used the greenish color called "Safari Green". Using a flat eyeshadow brush I put the green in the inner corner of the eyes, also make sure you use the patting technique so you don't over power the look with the green. Last before applying your brow bone color use a blending brush to blend out any harsh line you may have, and also to blend together the brown and green color in the middle of the crease. Finally use the lightest color in the palette which is call "Canvas" to highlight your brow bone. Now your look is complete, and to finish the rest of your makeup use your favorite foundation, blush, and a more neutral color for your lips. I hope you all enjoyed this look and if you have anymore question please feel free to ask. :)